Tuesday, August 30, 2011

Best.Day.Ever.

I needed an inspirational / uplifting quote to frame for my command center (more on that soon), so I reached out to pinterest for inspiration.  I found this:


Source: etsy.com via Rashmi on Pinterest

Super cute, right?  Well it links to Etsy.  Not that I have a problem paying for it {ok, maybe a little} but I'm impatient {and cheap, but you know}.

so, here's mine:


& because I love you, it's free.  Prints to 5x7.  I think it will look fab in a red frame, which is exactly where mine will be going.....


Monday, July 25, 2011

Monster Repellent

We've been invaded by Monsters.  I'm not sure where this fear came from, but bloody murder screams in the middle of the night at 3 1/2 years old is no fun.

I had to come up with something.  I've heard of monster spray that is water and essential oils.  My local grocery store didn't have water bottles, so I had to improvise. Plus, it had to be cute.


 I got room spray in a bottle that had an easy removable label.  I really wanted something "green", but the selection was scarce.  I keep this high on a shelf so it doesn't get tasted.  Yes--that would happen here.

Not much of a tutorial, take this:

cut off label, print this:


Modge podge your little heart out!  


viola!


Monster spray.  Hint: it's keeping the bad monsters outside when the room smells fresh.  That's my story anyway.

Download printable HERE!!

We'd love to hear other ideas of sneaky ways to trick your kids.

Wednesday, June 22, 2011

Boo Boo Box


With an upcoming road trip vaca, I needed a way to corral all our medical supplies, most of what is squishy and one quick step from a disastrous mess. 


I picked up a bead box from Joann's for 50% off, similar to what Sara used for her Teacher Appreciation Gifts.  I then grabbed my vinyl, dusted off my cricut {remember those?  I still use mine} and made this.


Here's the inside.


If you'd like my svg file: DOWNLOAD here.

Wednesday, June 8, 2011

Car Mats

My boys are completed obsessed with cars, trucks, airplanes, and trains.  I wanted to make them something that would be good to take with us somewhere to help keep them entertained.  

Here's my take on a car mat.


Firstly, I'm not quite a sew-er.  Before this, I've only made crayon rolls.  And this isn't quite a tutorial, since I winged it.  But, there are step by step photos to show you what I did.

Here's what I started with:


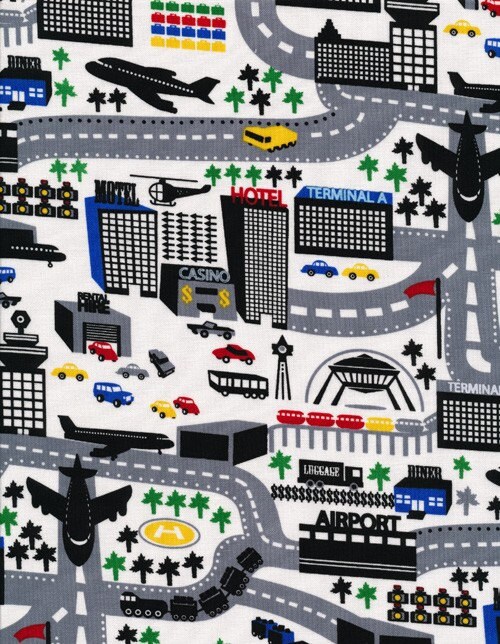
The fabric was Timeless Treasures Airport Bright with Multiple Choice Black purchased from UberStitch on Etsy.  Here are the details, how cute is that all the boys favorites are incorporated right into this fabric.


I convo'd UberStitch for a coordinating fabric suggestion.  She made a fantastic choice.  


Late night Saturday in our house, this is what my husband stayed up late watching while I set up shop on our coffee table


First step: add velcro to coordinating fabric for car/plane pockets.


Other side of Velcro goes on the pocket material.  I chose black felt.  I wasn't concerned with stretching since the Velcro would act as a stabilizer.


Sew on pocket.  Sew tunnels for individual cars.  I just laid the cars & planes down as a guide.


With right sides together, sew around 3 sides.


 Flip and press.

Fold and press a hem for your unfinished side.  Sew all 4 sides.  Don't forget your loop of elastic to hold your roll together.  I backstitched for added strength.


Here is the finished product on the back side.


Just add cars.


Fold in half, then roll!


Secure with elastic cord and you are ready for some fun on the go!!


Thanks for reading, please comment if you have any suggestions on posts, something you'd like to see, or any mistakes {even typos} that need to be corrected.

Happy Crafting.

Wednesday, June 1, 2011

End of Year Teacher Gifts

My boys recently celebrated their last day of their first year of preschool.  We wanted to do a little something for the staff, but needed to be budget friendly.  Additionally, this had to be quick since I waited until the very last day to throw it together.

Between the two boys, there are 2 teachers, 3 aides, 1 bus driver, and and aid for the driver. 

Here's what we came up with:


I was inspired by:
http://www.nothingbutcountry.com/
with their clever "Mint to Teach" gifts

along with "fortunate to be my teacher"

I was able to pick up vinyl paint cans and take out boxes at my local Michaels on the cheap.  I also grabbed a hand full of ribbon in fun, primary colors.  I then headed to Target for goodies.  I needed something mint for the teacher pails.  When I discovered the Wint-o-greens were sold out, I went with York Peppermint Patties.  For the take out boxes, I just used a general chocolate mix.  My boys helped me stuff all the containers.

To jazz up the boxes, I made a quick graphic in Photoshop {I use Elements} very similar as is available to download HERE.  The polka dot is a digital scrapbook paper freebie available HERE. My circles were about 4" in diameter, so I used my creative memories circle template system because I lack the skills to be a neat cutter.  I wanted to personalize the tops so at the end of the day we got all the credit we deserved for such cute packaging.  I simply made a smaller version of the circle as shown here.


Here they are, all together:


For less than $40 {including ribbon}, we have personalized, thoughful, edible gifts for seven special people that keep my kiddos safe and happy 4 days a week.

If you want to read more about my boys, visit our family blog here.


Thursday, April 14, 2011

just sayin'

We're still here....


There IS more to come, promise.  Alright, I'll do it...{pulling the twin card}.  Between the two of us, two sets of 3 year olds, potty training, preschool, 2 full time jobs, 2 husbands, 2 houses, 2 lives, half marathon/5K training....yadda yadda yadda.  


I know, I don't even have sympathy for myself ;)  Just trying to drum up some motivation.  


Tuesday, April 5, 2011

Cowboy Birthday Party

I have been DYING to have a cowboy birthday party, as it was *almost* our theme for year 1.  At year 3, I got it, even though the theme did not coordinate with the location.  THIS BLOG is what sent me over the edge. So simple, so not unique, so un-toddler like.   I knew immediately that I was going to steal  be inspired by these ideas.

I scraplifted some invitations from etsy. Notice the vinyl
 "brands".  That's all me :)

Here's the jpg of the invite:

I downloaded a ton of western fonts from dafont and used Photoshop Elements to create this invitation.  


I made a banner.

Paper was bandanna print and denim with kraft paper circles.  All materials were purchased at Hobby Lobby.  I used my cricut to cut the letters, stars, and bronc rider.  To make the pennants, I simply used my paper trimmer with the paper held at an angle.  Each pennant was 6" wide by 9" tall.  The circles were cut with a creative memories set that I purchased off Craig's list a few years ago.  I will definitely be using that tool again.

I made the horsey cupcakes & cupcake toppers.


do you like how the icing is melting off the cupcake?  Funny what you don't notice when you're worried about a room of 3 year olds. 


Ready for the close up:


I made treat bags with trail mix.

Treat Bag Topper up close:


Cowboy(girl) hats were necessary (Purchased at Hobby Lobby).

I also bought plastic sheriff stars, which I failed to remember to pass out to all the buckaroos.  Then I thought about incorporating the sheriff stars as part of our thank you notes, which still have not be done.  (psst....if you're reading this and you came to our party, thank you)

If you'd like to read about the fun, visit my personal blog HERE.  


I'm no graphic artist, but I know what I like when I see it.  And I like customizations, which is why I am so pleased about this party.  I didn't go crazy, but felt like I did enough.  I'm happy to share any of my files and don't mind one bit to update with your info.  Email me and I'll get back to you!!!


Giddy Up!! Yippee Kai Yay!!


Tuesday, March 1, 2011

Birthday party - sorta Seuss style

When trying to come up with a theme for my twins 3rd birthday party last month, I went the easy route and chose a theme that jived with the decor of the party location (also something "easy" -- we went with a "Pump it Up" location).  The wonderful bright colors of a Dr. Seuss theme seemed perfect!

Now, most people with twins seem to gravitate toward the "Thing 1" and "Thing 2" idea, but I wanted something a little less obvious (especially since my twins aren't identical).  Teal, black and red filled the color pallet and while I had a very strong desire to go all nuts with meaningless decor items, I tried to keep my craftiness under control.

I REALLY wanted to use by brand new sewing machine (thank you in-laws!).  I scoured the internet on hunt for project ideas and landed on a "green", reusable tote as an idea for favor bags (my now 3yr olds LOVE bags -- any kind -- so I hoped these would be a hit for our little party guests).   I used the tutorial found HERE to craft bags out of Robert Kaufman Seuss fabric

Image and video hosting by TinyPic


We filled the bags with a copy of "One Fish, Two Fish" and some colorful goldfish crackers in a treat bag.


I know B&K love to play with their totes daily, so I hope the other guests enjoyed them, too!

I also felt they needed to stand out a bit.  So I took to making them special applique birthday shirts and crowns  (both of which I sewed mainly by hand . . . while I sort of mastered my "sewing in a somewhat straight line" skills with the bag project, circles and tight corners was a little out of my league at this point!). 

Image and video hosting by TinyPic

Image and video hosting by TinyPic


The tutorial for B's crown can be found here and the pattern for K's tiara can be found here

Wednesday, February 16, 2011

Felt Mini Crayon Roll Tutorial


My twins are in their first year of preschool and we just encountered our first "Valentine Exchange".  I know a lot of parents are trying to watch what their children eat and personally the last thing we need in our house is another bag of mini candy!  So I decided to put on my craft hat and make a mini crayon roll to give out with our personalized "color in" Valentine cards (we gave out these and these).   I had purchased a few boxes of crayons on wicked sale at the beginning of the school year, I grabbed some ribbon from my ever growing stash and I had a ton of felt left over from the Halloween costumes I made last fall.  So besides picking up a new spool of thread for my new sewing machine, the cost for this project was pretty minimal. 


Supply List

Felt (I used off the bolt felt)
Ribbon (cut into strips 10in long)
Thread
Scissors or a rotary cutter
Pinking Shears
Ruler
Marker or fabric marker
Crayons


I first started to cut my felt with scissors, then quickly discovered I suck at cutting straight lines.  So, ultimately, I broke down and bought a new small rotary cutter and mat.

For each roll I cut two squares of my main color (in this case, chocolate brown) 7in x 6in.  For the pocket color (red) I cut the square 8in x 6in.

{here is where I'll disclose that I was VERY generous with measuring out my felt squares.  I am a beginner with my new sewing machine, so things like "seam allowance" and sewing in a straight line aren't yet 2nd nature for me.  So I gave myself extra room for mistakes.  If you are an experienced sewer, you might want to go a little smaller.  My finished crayon roll measures 6in x 5in or so).


Fold the pocket piece in half, with the fold at the top.  I used a special ruler with slots for an inch, etc. to mark out my crayon pockets, but you could easily use a regular ruler (or straight edge) to mark out the pockets & lines.  I started the first one 1 1/4in in, then marked an inch for 3 pockets and the last pocket should have another 1 1/4in from the other side (see, here I go showing off my lack of sewing skills again.  Basically, I measured out where my outer seam would be, then marked for the inside pockets.  In total, there should be 5 pockets for crayons).  


Take a piece of your main color felt and line it up behind the pocket color.  Sew down your markings for the pockets.  I made sure to back-stitch at both the top & the bottom of each line.  I only stitched the four inside lines for the three inner pockets as the other pockets will be created when you sew your two main color pieces of felt together. 


Line up the second piece of main color (brown for mine) behind the piece you just sewed with the pockets.  Now you will sew all around the roll.  As you approach the right side, slip two of the cut ribbons in between the main color felt -- I placed it just as the red pocket color started.  I made sure to back stitch a few times over the ribbon spot as to make sure it is secure. 


Once you have sewn all around the mini roll, break out those pinking shears and cut around the edges.  {here is where I tried to make up for any unstraight lines!  Pinking shears are my new BFF!}  Be careful as you near the spot of the ribbon -- I had to cut into it from a couple of different angles to make sure I didn't accidentally snip up the ribbon.


Insert crayons and VOILA!  You now have a mini crayon roll - perfect to stash in backpacks or mama's purse.  Or hand out as party favors or Valentine's "treats". 


  This is a great beginner sewing project (it was only my 2nd time using my machine) and I was finished with 8 rolls in an evening (which explains the poor quality of pictures -- the lighting in my basement isn't the best and the only time I have to craft is after my kiddos are in bed). 

As I like to say, if I can master this project, ANYONE can!